Create an alert policy
You will write one rule: what to watch for, where, which vehicles it covers and how serious a match is. When you save it, the rule starts watching straight away.
The wizard has four steps — Basics, Conditions, Applies to and Review — and the same four are used when you change a policy later.
Only legal vehicles can be selected as targets or shown in a rule preview. Alert rules are evaluated only for legal vehicles. A vehicle that stops being legal is hidden from the picker and preview.
Before you start
- Your role must allow you to create policies. Supervisor, Operational manager and System admin can; Operator cannot, and will not see the New policy button. See What each role can do.
- If the rule watches an area, draw the area first. The wizard can only pick from geozones that already exist, and it cannot create one. See Draw a geozone.
- Know which vehicles the rule is for: the whole fleet, one GPS provider's vehicles, or a named list of plates.
- Decide the severity, because it settles more than the colour of a badge: it sets the response window (Critical 5 minutes, High 15, Medium 60, Low and Info none) and it decides which alert routing rules send emails and text messages.
There is no draft state and no "save but leave it off". A policy you create is Active immediately, and because the first position report it sees for a vehicle counts as a change, every vehicle already in the matching state raises an alert at once. Write new policies when somebody is watching Events, and consider starting with Specific vehicles or one provider rather than the whole fleet.
Open the wizard
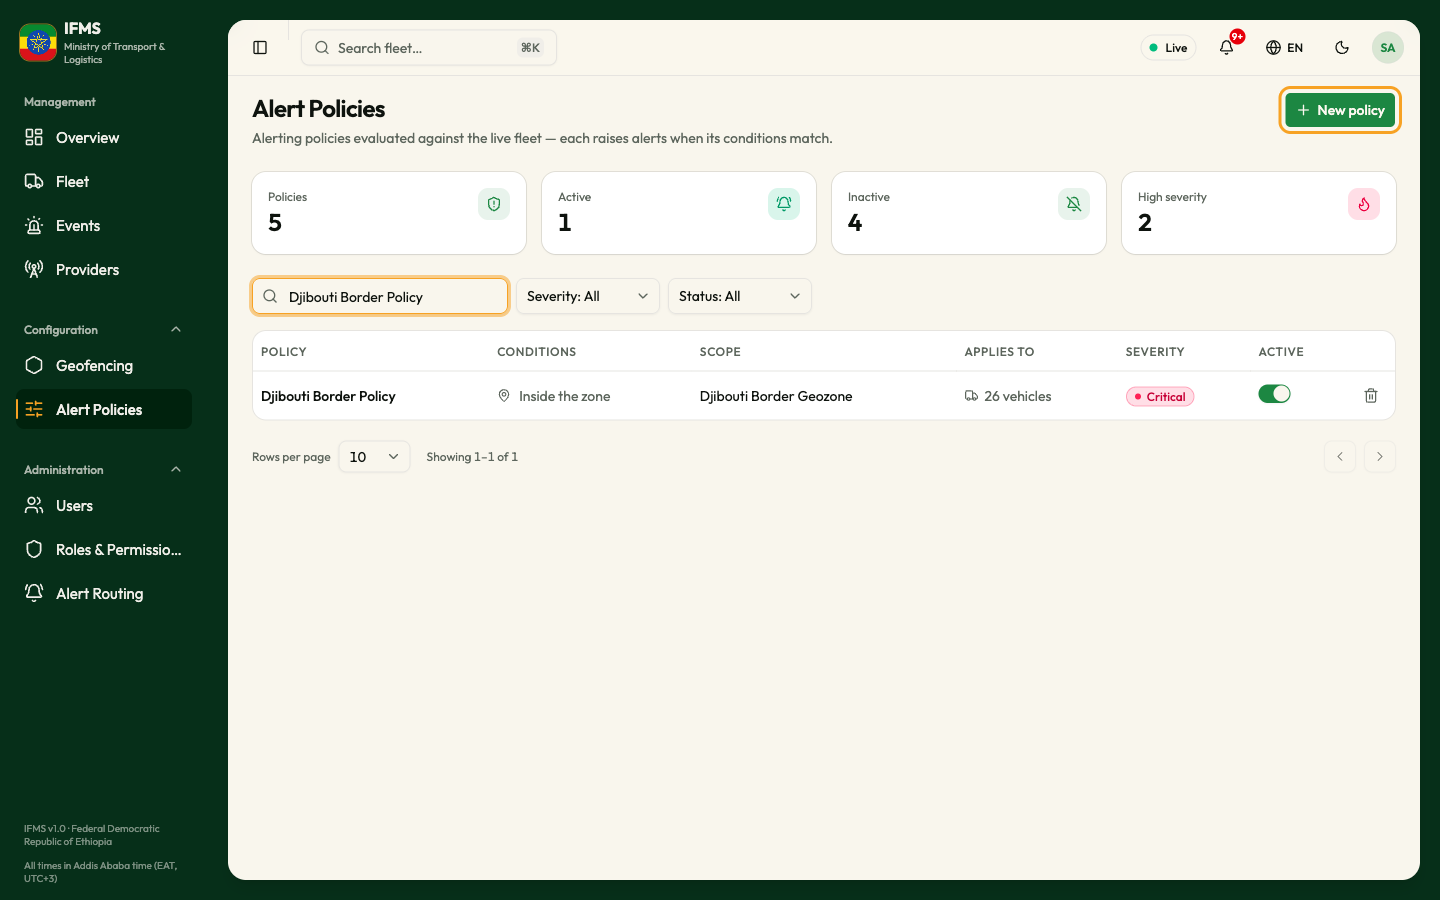
- In the sidebar, open Configuration and select Alert Policies.
- Select New policy at the top right.
The screen is titled New alert policy, with the line "Define the conditions to watch for, who it applies to, and who gets notified."
Along the top is the step indicator: 1 Basics, 2 Conditions, 3 Applies to, 4 Review. The step you are on is ringed. Steps you have finished carry a tick and can be selected to go back; steps ahead of you cannot.
At the bottom are Back (greyed out on step 1), a counter such as 1 / 4, and Next.
Next simply stays greyed out until everything the step needs is filled in. No message appears, and nothing is marked in red. If Next will not move, check the fields marked with an asterisk on the step you are on; the field tables below say exactly what each one needs.
Cancel, at the top right, leaves the wizard without saving and asks nothing.
Step 1: Basics
The step is headed Policy basics — "Name the policy and set how and when it fires."
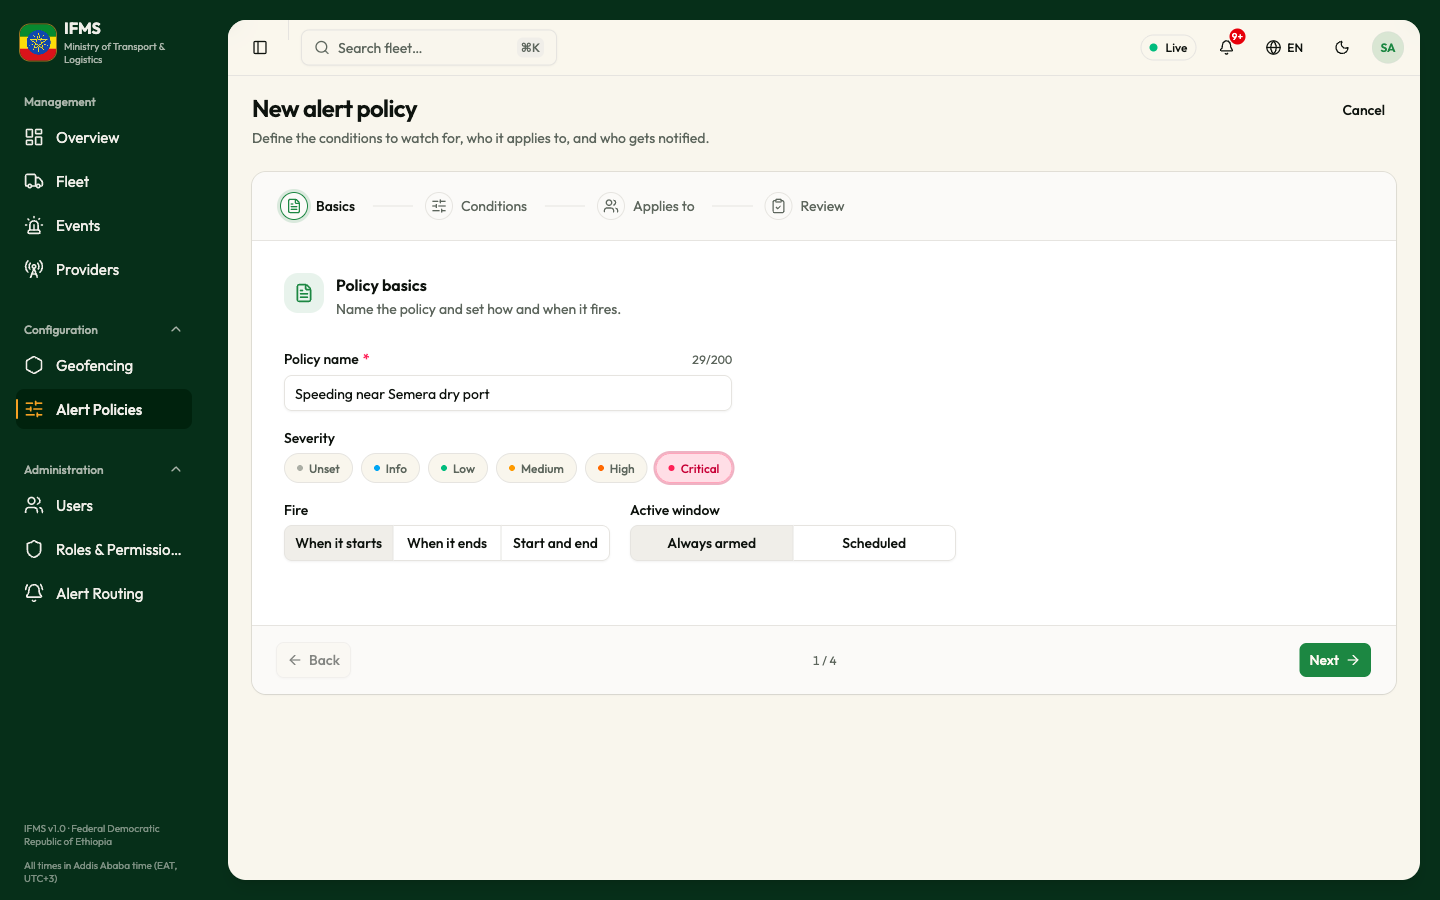
- Type a Policy name.
- Choose a Severity.
- Choose when the policy should Fire.
- Leave Active window on Always armed (see the caution below).
- Select Next.
| Field | Required | What to enter | Rules and messages |
|---|---|---|---|
| Policy name | Yes | What the rule is for, in words an operator will understand in a hurry — "Galafi border crossing entry". The name becomes the message on every alert the rule raises. Placeholder: "e.g. Awash checkpoint speeding". | Next stays greyed out while it is empty or contains only spaces. Names longer than 200 characters are refused when you save, with a red message; nothing counts the characters for you. |
| Severity | No | One of six pills: Unset, Info, Low, Medium, High, Critical. Medium is chosen for you. | Unset gives the alerts no severity at all: they show as Info, never breach a response window and are never escalated. |
| Fire | Yes | When it starts, When it ends or Start and end. When it starts is chosen for you. | Always set; see below. |
| Active window | Yes | Always armed or Scheduled. Always armed is chosen for you. | See the caution below. |
| Schedule (cron) | Yes, when Scheduled is chosen | A standard cron expression, for example 0 6-18 * * MON-FRI. Hint: "Standard cron — the policy is armed only during these times." | Next stays greyed out while it is empty. Nothing checks that the expression makes sense. Longer than 120 characters is refused when you save. |
What "Fire" really does
IFMS checks the policy's conditions on every position a vehicle reports and compares the answer with the previous one. The change from one to the other is what raises an alert.
| Fire | Raises an alert when | The alert's message ends |
|---|---|---|
| When it starts | The conditions begin to match — the vehicle was not matching, now it is. | "(Start)" |
| When it ends | The conditions stop matching. | "(End)" |
| Start and end | Both of the above. | "(Start)" or "(End)" |
This is why the wizard has no "entry" and "exit" options: entering a zone is Inside the zone + When it starts, and leaving it is Inside the zone + When it ends. Policy recipes sets out the combinations.
What severity decides
| Severity | Badge on the alert | Response window | Escalated if not picked up |
|---|---|---|---|
| Critical | Critical (rose) | 5 minutes | Yes |
| High | Critical (rose) | 15 minutes | Yes |
| Medium | Warning (amber) | 60 minutes | Yes |
| Low | Info (sky blue) | none | No |
| Info | Info (sky blue) | none | No |
| Unset | Info (sky blue) | none | No |
Severity also decides which routing rules reach people by email and text message, because those rules work on a minimum severity. See Response times and escalation and Alert routing.
The Active window
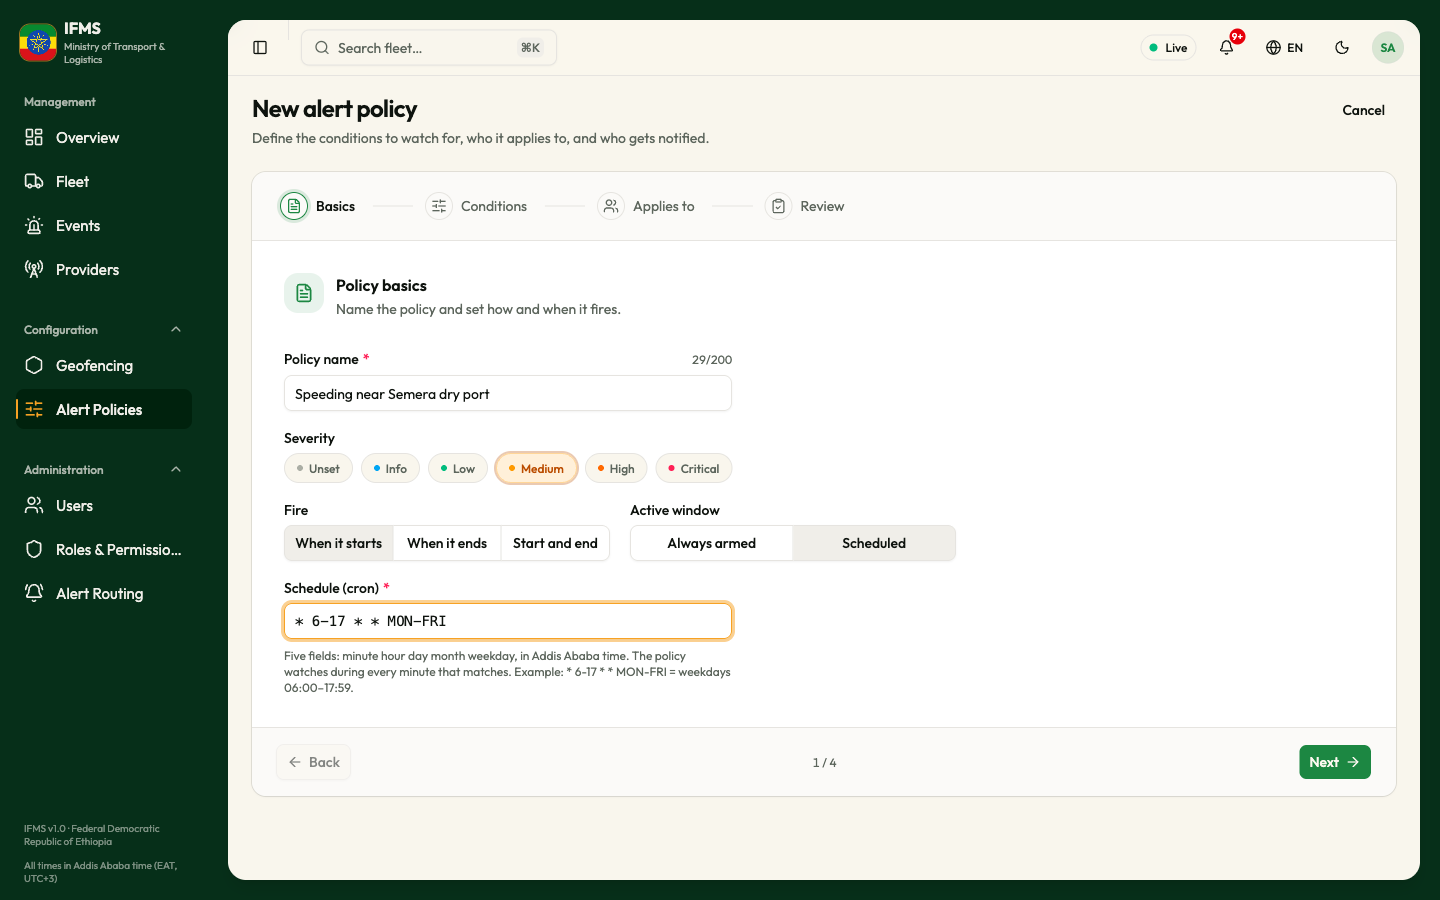
Choosing Scheduled reveals Schedule (cron), a single box for a standard cron expression. The hint says the policy is armed only during those times.
The schedule is saved but never applied. A policy set to Scheduled is checked against every position report at all hours, exactly as if it were Always armed, and the hint under the box is not true of the current system.
Nothing warns you about this, and nothing checks that what you typed is a valid cron expression either. Until it is fixed, leave Active window on Always armed and switch a policy off when it should not be watching, using the ACTIVE switch on the policy list. If you need time-of-day rules, raise it with the IFMS team.
Step 2: Conditions
The step is headed Conditions — "Add one or more clauses, and choose how they combine." It also carries the Scope — the area the conditions are measured against — and a preview map.
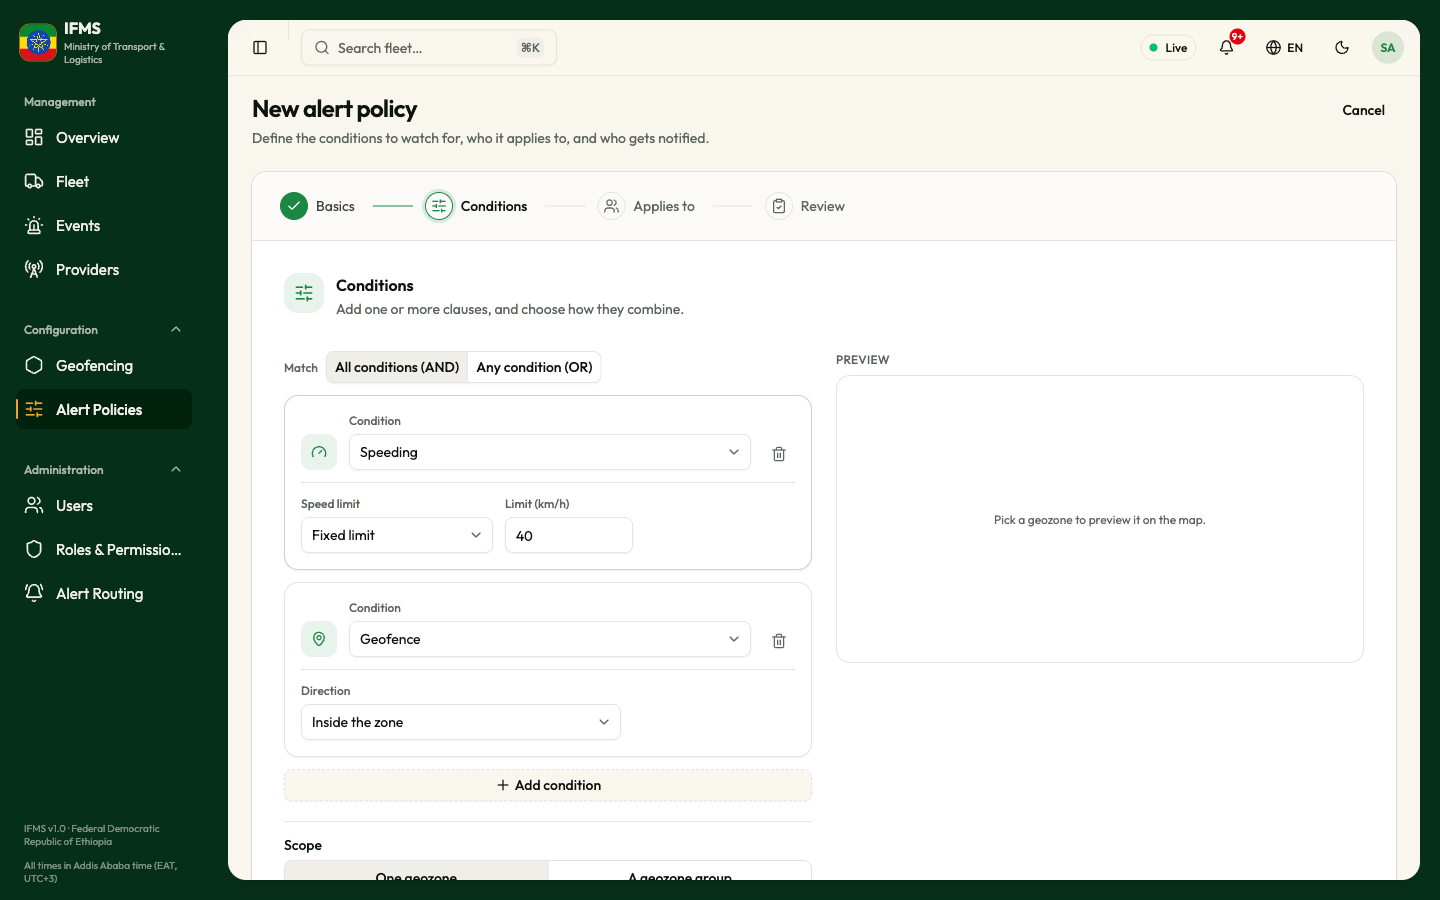
- The policy starts with one condition: Geofence, Inside the zone. Change Condition to the kind you want.
- Fill in the fields the condition needs.
- To watch for more than one thing at once, select Add condition and repeat.
- With two or more conditions, choose under Match whether All conditions (AND) must be true or Any condition (OR) is enough. All conditions (AND) is chosen for you.
- If a Scope box has appeared, choose the geozone.
- Select Next.
Each condition sits on its own card, with its type icon, the Condition dropdown, and — once there are two or more cards — a waste-basket button to remove it. The last remaining condition cannot be removed. Changing a card's type keeps anything you typed into the fields of the previous type, in case you change back.
The four conditions
| Condition | Fields | What it matches |
|---|---|---|
| Geofence | Direction: Inside the zone (chosen for you) or Outside the zone. | Inside matches for as long as the vehicle's position falls within the geozone in Scope; Outside matches for as long as it does not. A report with no coordinates counts as "not inside". |
| Speeding | Speed limit: Fixed limit (chosen for you) or Use zone's limit. With Fixed limit, also Limit (km/h), which starts at 70. | Matches while the vehicle's speed is above the limit. Exactly the limit does not match. |
| Ignition | Ignition: On (chosen for you) or Off. | Matches while the tracker reports the ignition in that state. Vehicles whose provider does not report ignition at all never match. |
| Idle / distance | Idle minutes, which starts at 30. | Matches once the vehicle has been idling — its last report is recent, the ignition is not reported off, and its speed is 3 km/h or below — for at least that many minutes. |
| Field | Required | What to enter | Rules and messages |
|---|---|---|---|
| Limit (km/h) | Yes, with Fixed limit | A speed above zero. Decimals are accepted. | Next stays greyed out for letters, zero or a negative number. |
| Idle minutes | Yes | A whole number of minutes, zero or above. | Next stays greyed out for an empty box, letters or a negative number. 0 is accepted, and means an alert the moment a vehicle starts idling. |
Despite its name, this condition measures idling minutes. Distance plays no part in it, and there is nothing to set about distance. The alerts it raises are labelled Excessive idling. It is also only re-checked when a new position arrives, so a vehicle that has stopped reporting will not trip it.
This option compares the vehicle's speed with the Speed limit (km/h) stored on the geozone (see Draw a geozone). When the chosen zone has none, the wizard warns "This zone has no speed limit; the condition will never fire." Set the limit on the zone, or use Fixed limit and type the number.
Scope: the area the conditions use
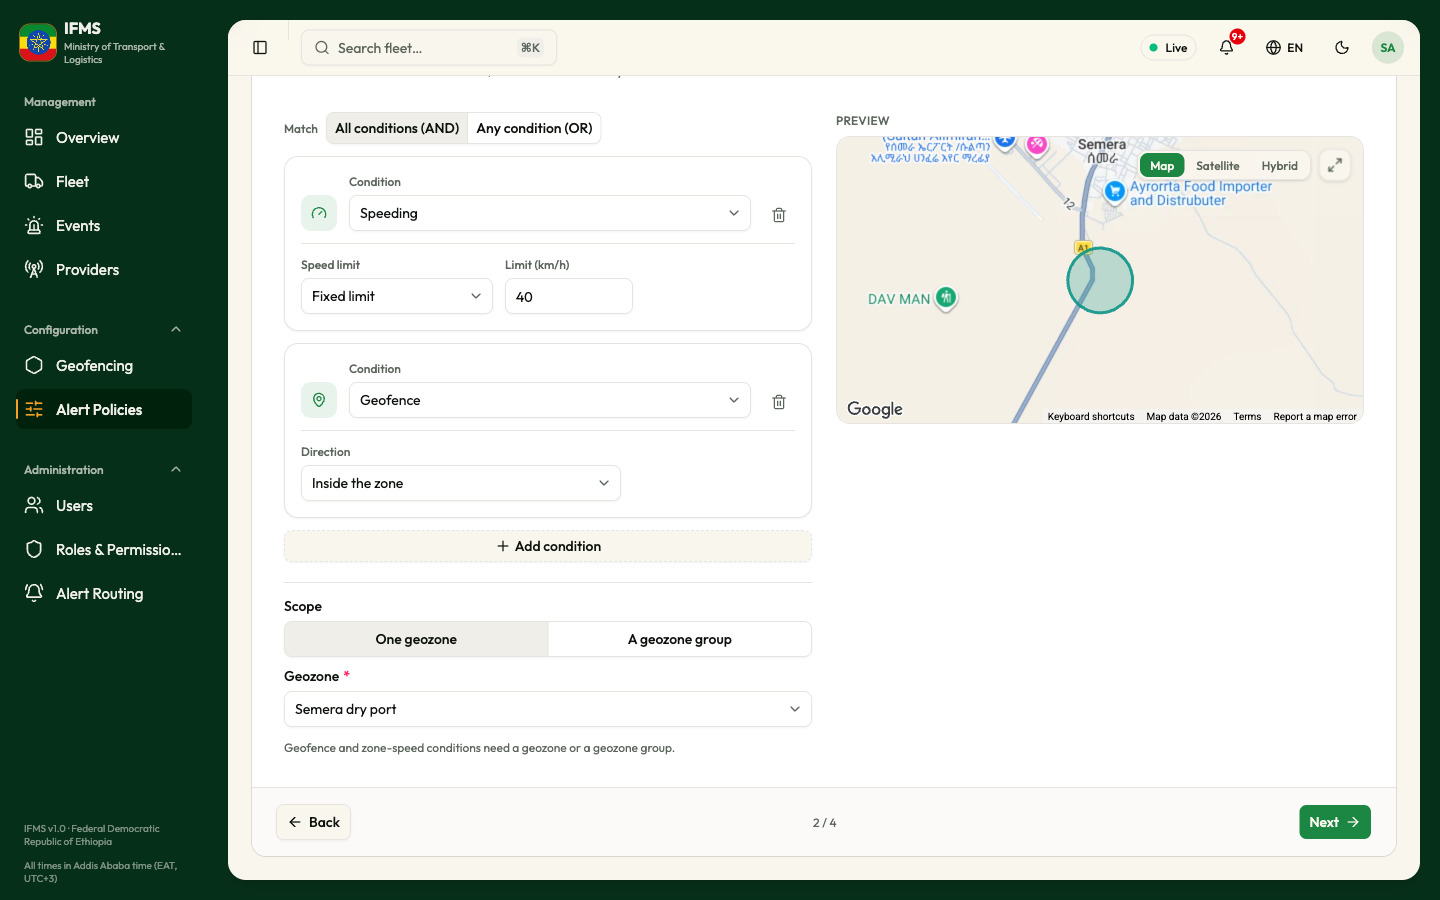
Scope appears under the conditions only when a condition needs an area — that is, any Geofence condition, or a Speeding condition set to Use zone's limit.
First choose what the conditions watch: One geozone or A geozone group.
| Field | Required | What to enter | Rules and messages |
|---|---|---|---|
| Geozone (with One geozone) | Yes, when shown | The area to watch, from the list of switched-on geozones. Placeholder: "Choose a geozone". | Next stays greyed out until one is chosen. |
| Geozone group (with A geozone group) | Yes, when shown | A group — Dry ports, for example. The policy then watches every zone in the group, including zones added to it later. Placeholder: "Choose a geozone group". | Next stays greyed out until one is chosen. |
The hint under the fields reads "Geofence and zone-speed conditions need a geozone or a geozone group."
The Preview panel on the right draws the chosen zone on a map. Before you choose one it says "Pick a geozone to preview it on the map."
A policy has one scope: one geozone or one group. To watch several unrelated areas, put them in a group, or write one policy per area. If you remove the last condition that needs an area, the scope is cleared when you save.
Zones that are switched off are not offered. When you edit a policy whose zone has been switched off since, the zone shows as "name (inactive)" and cannot be chosen again; the message "This geozone is inactive; choose another" asks you to pick another. A zone or group a policy uses cannot be deleted until the policy is changed.
Step 3: Applies to
The step is headed Who does it apply to? — "Watch the whole fleet, one provider, or specific vehicles."
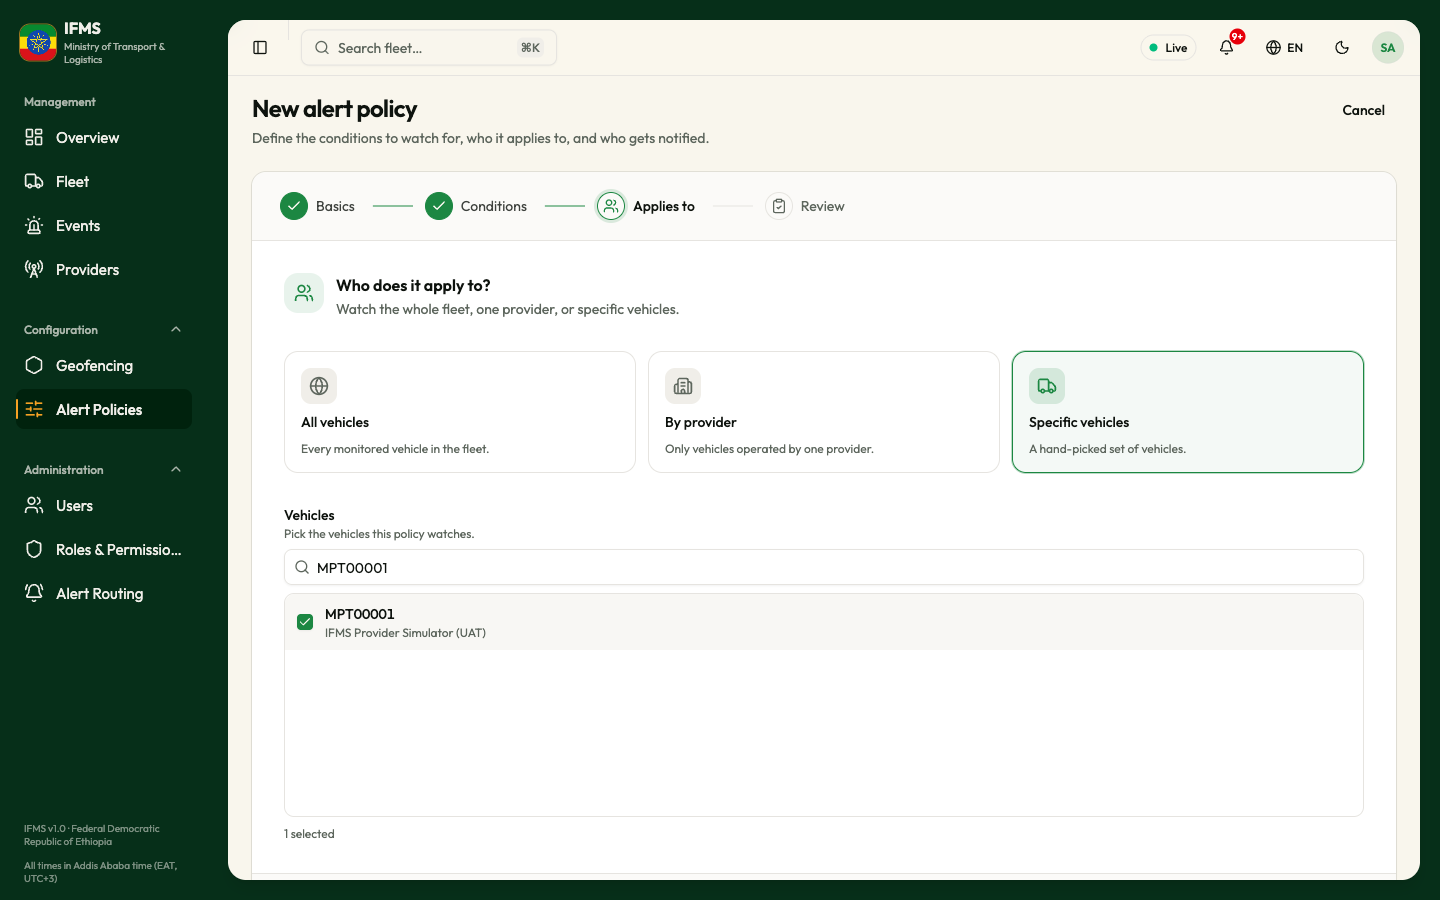
- Choose one of the three cards. The chosen one is outlined and tinted.
- Fill in whatever the card asks for.
- Select Next.
| Card | What it means | What it asks for |
|---|---|---|
| All vehicles | "Every monitored vehicle in the fleet." Chosen for you. | Nothing. |
| By provider | "Only vehicles operated by one provider." | Provider — required. Placeholder "Choose a provider". Next stays greyed out until one is chosen. |
| Specific vehicles | "A hand-picked set of vehicles." | A list of vehicles to tick. |
Picking specific vehicles
The picker is headed Vehicles, with the hint "Pick the vehicles this policy watches." It offers a search box — Search vehicles…, which matches the plate or the provider as you type — and a scrolling list where each row shows the plate in bold and its provider in grey. Under the list, {count} selected keeps score.
When there is nothing to show, the list says "No vehicles available."
The vehicles you tick are saved with the policy when you select Create policy on the last step.
The picker offers the vehicles IFMS has live positions for. A vehicle whose tracker has never delivered anything cannot be ticked, even though it exists on Fleet. Wait until it reports, or use By provider instead.
Specific vehicles with nothing ticked can be saved. The policy is then shown as Active on the list and watches nothing at all. Check the count under the list before moving on, and check APPLIES TO on the policy list afterwards.
Target vehicles when you are changing an existing policy
When you open a saved policy, the same step is headed Target vehicles and is split into three parts.
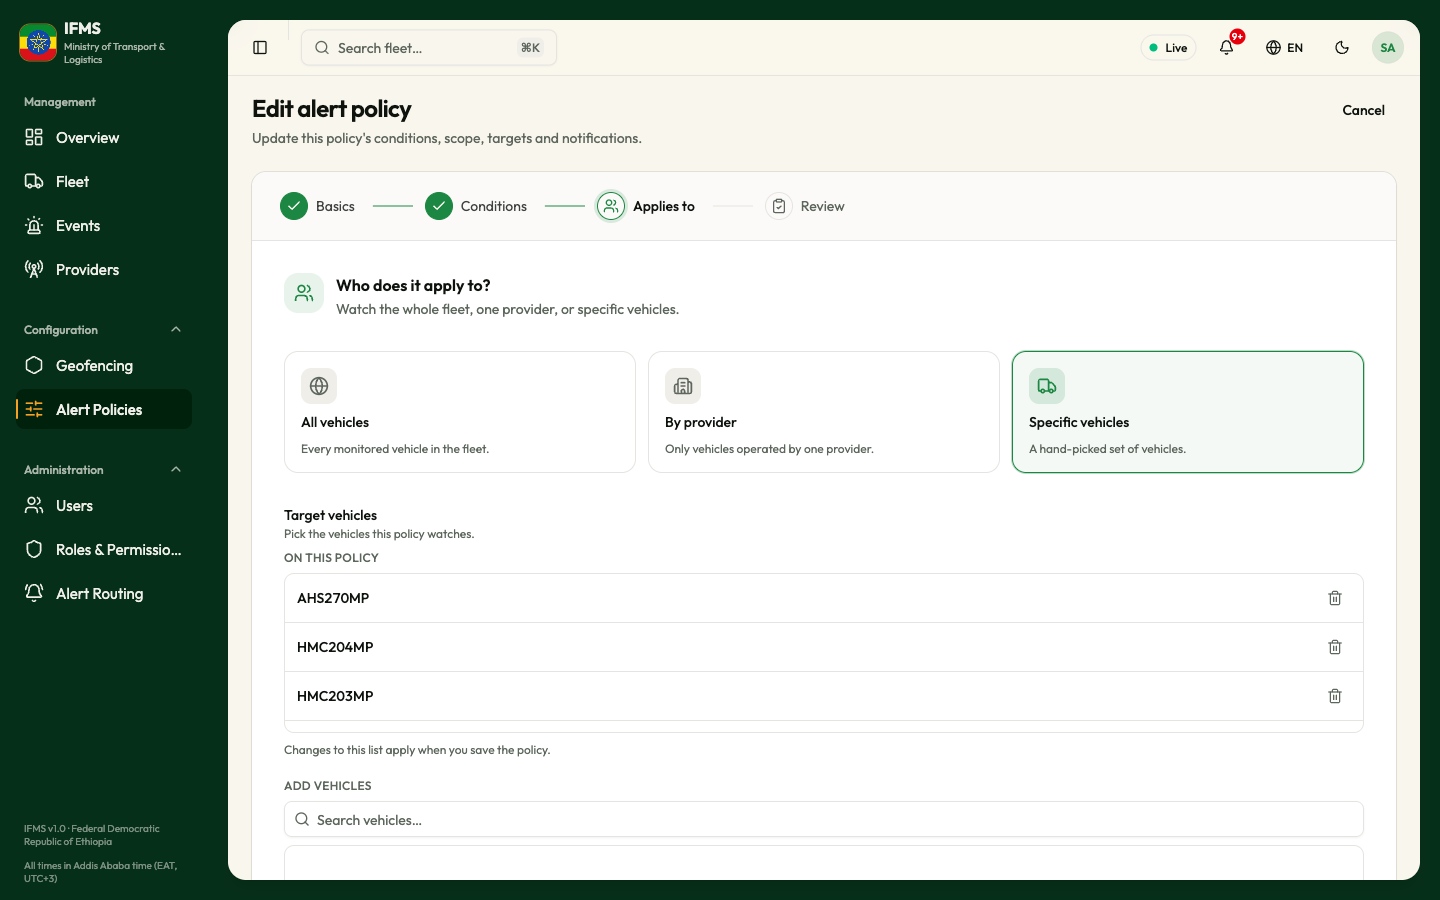
| Part | What it does |
|---|---|
| On this policy | The vehicles the policy watches now, each with a waste-basket button. Empty, it reads "No vehicles yet." |
| Add vehicles | A ticklist of everything not already on the policy, and an Add selected button. The button is off until something is ticked. |
| Bulk import | "CSV with a single "plate" column, one per row." and an Import CSV button that opens a file chooser for .csv files. |
Each of these acts at once, with a message — Vehicle removed, Vehicle added, or Imported 18 of 20 vehicles — and no confirmation question.
Adding, removing and importing vehicles change the stored policy the moment you do them, even if you then select Cancel and never save the wizard. There is no confirmation and no undo; to put a vehicle back you add it again.
Two more traps:
- Importing tells you only a count. "Imported 18 of 20 vehicles" does not say which two failed. Check On this policy afterwards against your file. A plate is only accepted if it matches a vehicle exactly (capitals are ignored); unknown plates are counted as failures, and repeats in the file are ignored.
- Files must have a column headed
plate, must contain at least one row, and may hold at most 2,000 rows. Larger files are refused with "The uploaded file exceeds the maximum number of rows.", empty ones with "The uploaded file contains no data rows."
If you change a saved policy from Specific vehicles to All vehicles or By provider and save, the vehicle list is thrown away. Changing back gives you an empty list to build again.
Step 4: Review
The step is headed Review — "Check the policy before saving."
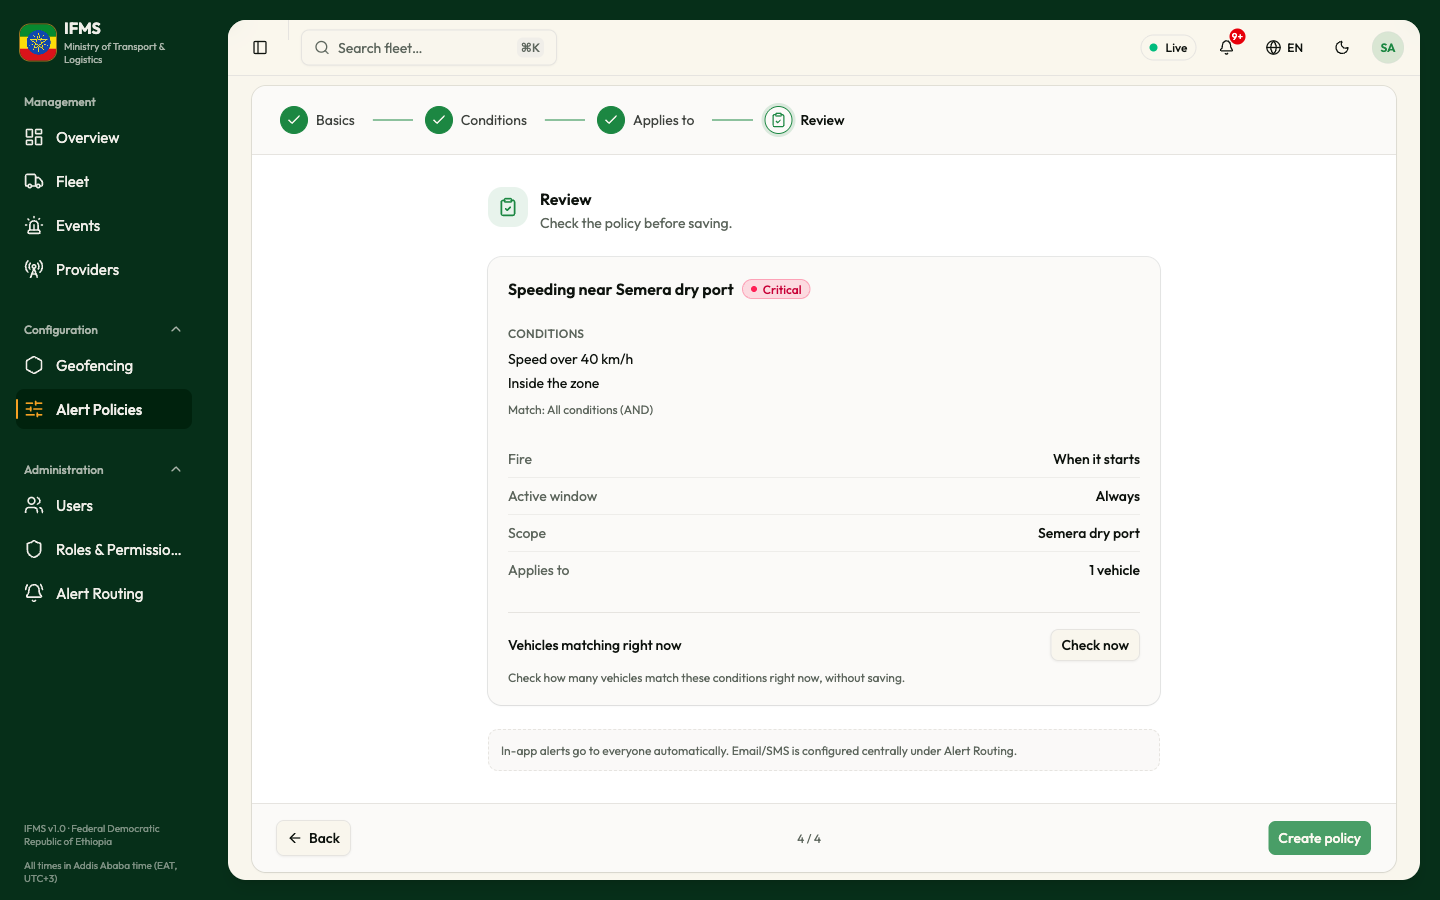
The summary card shows four lines:
| Line | What it says |
|---|---|
| Conditions | How many, and how they combine — "2 · All conditions (AND)". |
| Scope | The geozone's name, or "—". |
| Applies to | All vehicles, Provider: <name>, or a count of vehicles. |
| Severity | The severity badge, or "—" when unset. |
Underneath is a note: "In-app alerts go to everyone automatically. Email/SMS is configured centrally under Alert Routing." That is exactly right — a policy has no recipient list of its own. Every alert it raises reaches every colleague's Inbox, and emails and text messages are decided by alert routing rules.
The name, Fire, Active window, the schedule and the actual condition details are all missing from this summary. It will not, for example, tell you whether your geofence condition says inside or outside, or whether the policy fires on start or on end — the two settings most likely to be wrong. Select 2 Conditions and 1 Basics in the step indicator and read them again before you save.
Select Create policy. The message Policy created confirms it and you land back on Alert Policies with the new rule in the list, already switched on.
When you are changing a policy the button reads Save changes and the message is Policy saved.
If something goes wrong
| What you see | What it means | What to do |
|---|---|---|
| Next stays greyed out on Basics | The name is blank, or Scheduled is chosen and the schedule box is empty. | Fill them in. |
| Next stays greyed out on Conditions | The speed limit is not a number above zero, the idle minutes are blank or negative, or a geozone is needed and none is chosen. | Check each condition card, then the Scope box. |
| Next stays greyed out on Applies to | By provider is chosen with no provider. | Choose one. |
| Create policy stays greyed out | An earlier step is incomplete, or the policy is already saving. | Step back through the indicator and look for an empty field with an asterisk. |
| A red message mentioning Conditions or Scope | The rule was refused when saved — usually a speed limit of zero or a geofence condition with no area. | Go back to Conditions and correct it. |
| A red message about the name or the schedule | The name is over 200 characters, or the schedule is over 120. | Shorten it. |
| "That policy no longer exists" with a Back button | Somebody deleted the policy while you had it open. | Select Back. Nothing you typed can be saved. |
| An Edit alert policy screen showing empty fields | The policy is still loading. | Wait a second or two for the values to appear; do not start typing before they do. |
After you save
- The policy is Active and starts checking the very next positions.
- Watch Events for a few minutes. A burst of alerts means the rule is matching vehicles that were already in that state; it is not necessarily wrong, but it is worth seeing.
- If nothing appears at all, check in this order: the ACTIVE switch on the policy list; whether the Scope zone is switched on; whether the vehicles the rule covers are actually reporting; and whether the condition really matches what you meant — Fire and Direction together are the usual culprits. Policy recipes gives the combinations that work.
When you change a saved policy, IFMS keeps what it last knew about each vehicle. Right after an edit a vehicle can raise an alert it would not have raised, or miss one, depending on what it was doing when you saved. Expect one odd result per vehicle after an edit, and no more.