Roles and permissions
A role is a named bundle of rights. Everything a colleague can see or do in IFMS comes from the roles on their account: open the live map, acknowledge an alert, draw a geozone, add a user. Nothing is granted to a person directly.
This screen lists the roles, shows exactly what each one grants, and lets you build roles of your own when the person roles do not fit.
Who can open this screen
System admin can do everything here. Operational manager can open the screen and look at roles, but cannot create, change, switch off or remove one. Nobody else has the item in their sidebar. See What each role can do.
How to open it
- In the sidebar, open the Administration group.
- Select Roles & Permissions.
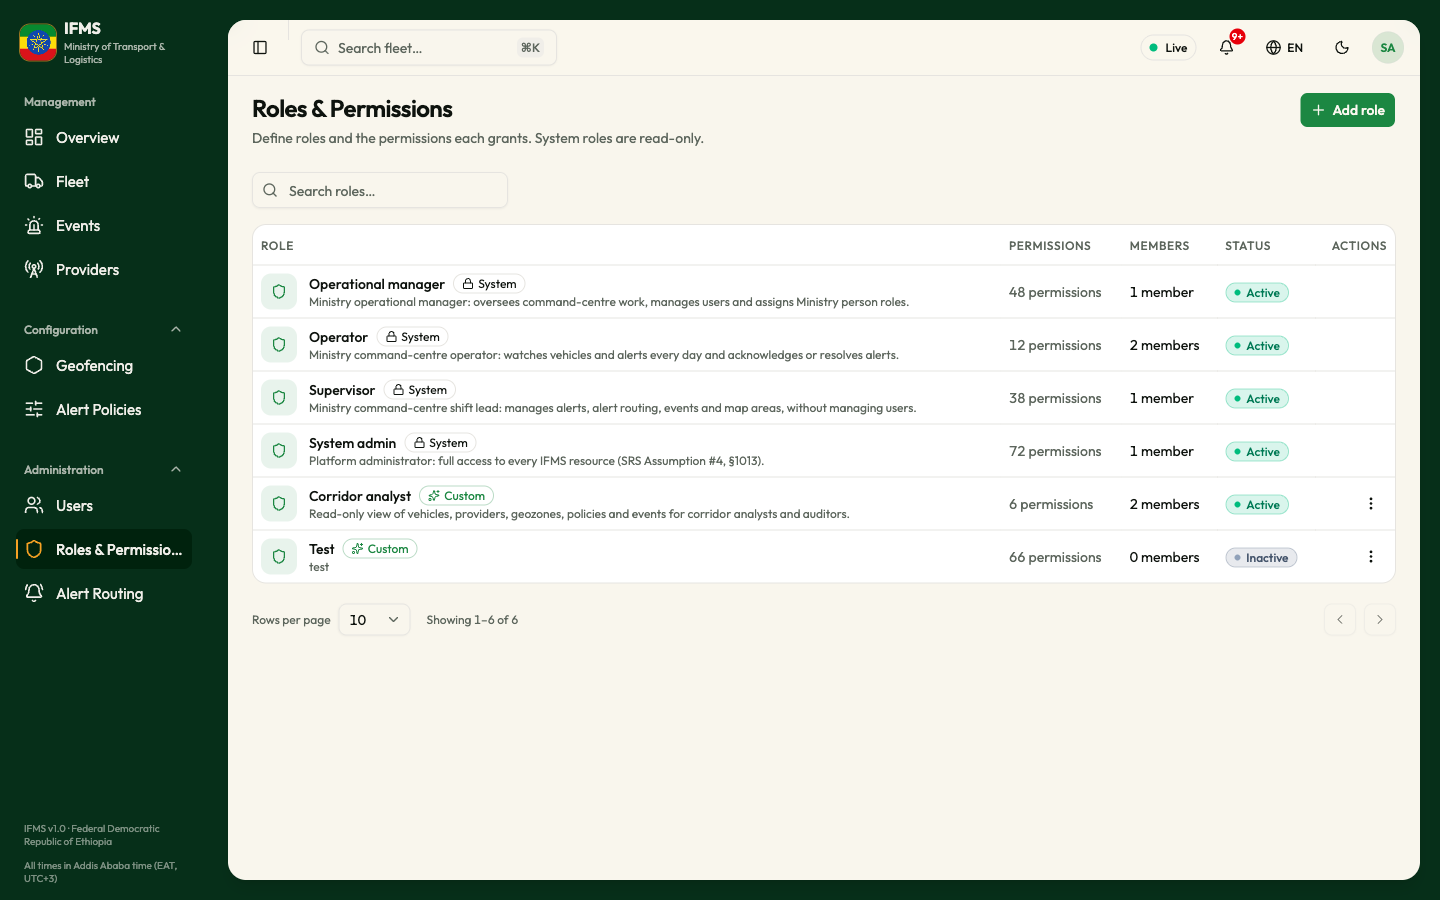
System roles and custom roles
| System roles | Custom roles | |
|---|---|---|
| Where they come from | Built into IFMS when it was installed | Created on this screen by an administrator |
| Badge in the list | System, with a padlock | Custom, with a sparkle |
| What you can do with them | Look at them | Look at them, change them, switch them off and on, delete them |
A system role has no three-dot menu. Select its row to look at it.
The four person roles
| Role | Who it is for | What it allows |
|---|---|---|
| System admin | The Kairos platform administrator | Full platform access. Only this role can change platform settings, run permission sync or edit the role catalogue. |
| Operational manager | The Ministry's top person | See everything. Create and manage users. Give any of the three Ministry roles. Manage geozones, alert rules and alert routing. Cannot change platform settings, permission sync or the role catalogue. |
| Supervisor | Command-centre shift lead | See everything. Acknowledge and resolve alerts. Manage geozones, alert rules and alert routing. Cannot create or manage users. |
| Operator | Daily monitoring staff | See the map, vehicles and alerts. Acknowledge and resolve alerts. Cannot change anything else. |
Machine roles are hidden from the role list and all role pickers.
Only System admin can create or change custom roles. A custom role must not give vehicle creation, editing or deletion to Ministry staff.
Who may give which role to a colleague is explained in Users — Which roles you can give.
The toolbar and the table
Search roles… narrows the list as you type, matching the role name, its role key and its description. There are no filters.
| Column | What it shows |
|---|---|
| ROLE | A shield tile, the role's name, the System or Custom badge, and underneath the description (or the role key when there is no description). |
| PERMISSIONS | How many separate rights the role grants, for example "17 permissions" or "1 permission". |
| MEMBERS | How many people currently hold the role, for example "3 members". |
| STATUS | Active (green) or Inactive (grey). |
| ACTIONS | The three-dot button that opens the row menu. Custom roles only. |
Below the table: Rows per page, the count ("Showing 1–6 of 6") and the arrows for the previous and next page. If nothing matches your search the table reads "No roles found" / "Try a different search, or add a new role."
Selecting a row opens Edit role when the role is a custom role that is switched on and you are allowed to change roles. In every other case — a system role, a switched-off custom role, or an Operational manager or Supervisor looking at any role — it opens View role.
The row menu
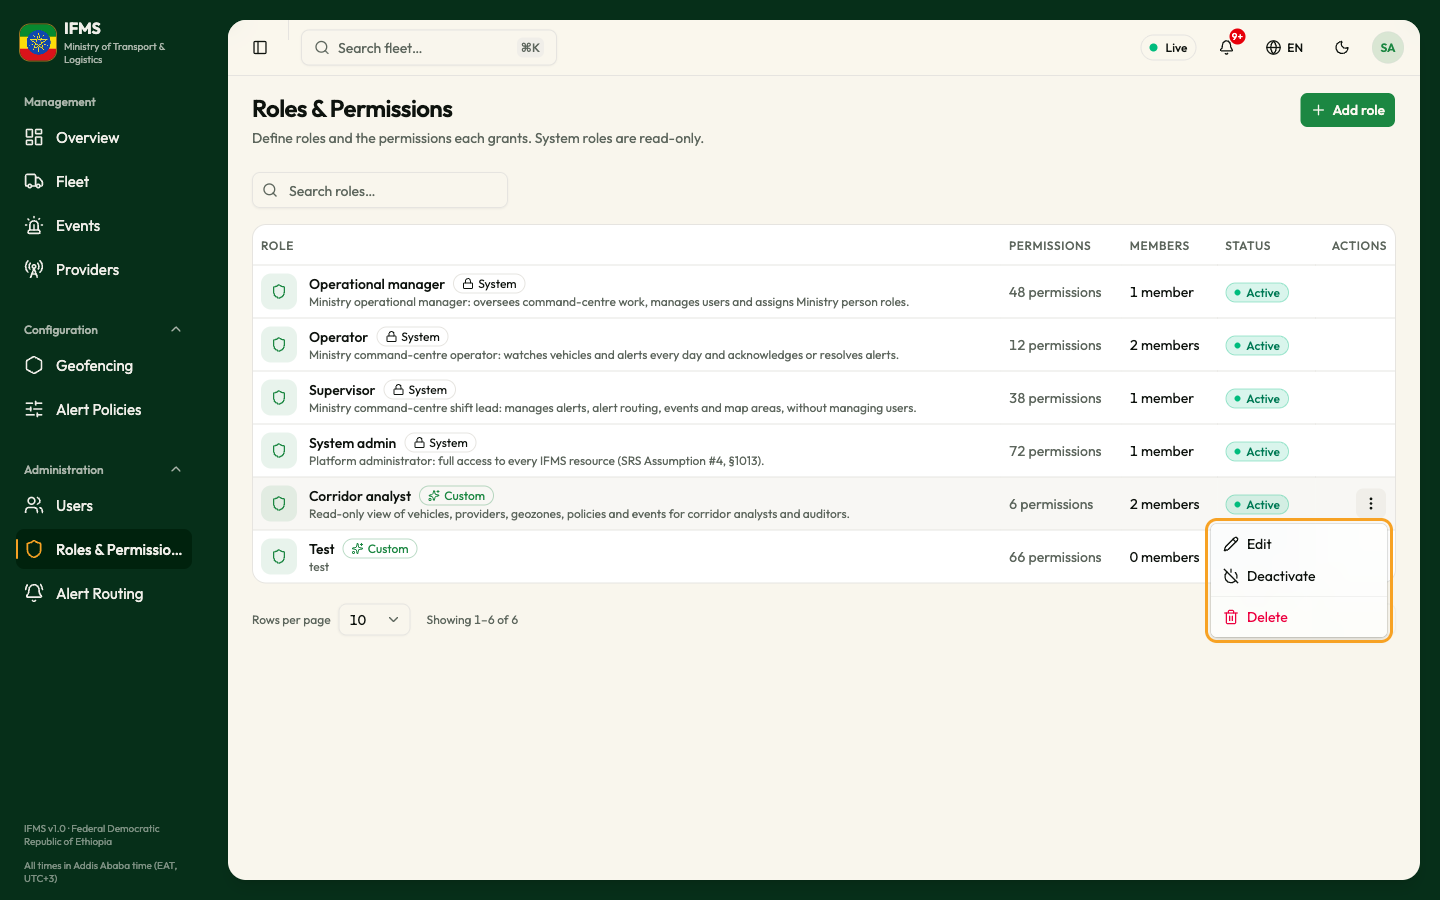
| Role | Menu items |
|---|---|
| Custom, switched on | Edit, Deactivate, then Delete in red |
| Custom, switched off | Activate, then Delete in red. To edit it, activate it first. |
| System | No menu |
View a role
Select a system role's row (or any role, if you may only look) to open View role — "This role's details and the permissions it grants." It has the same layout as the editor, but nothing can be changed. Use it to answer "what exactly does this role allow?".
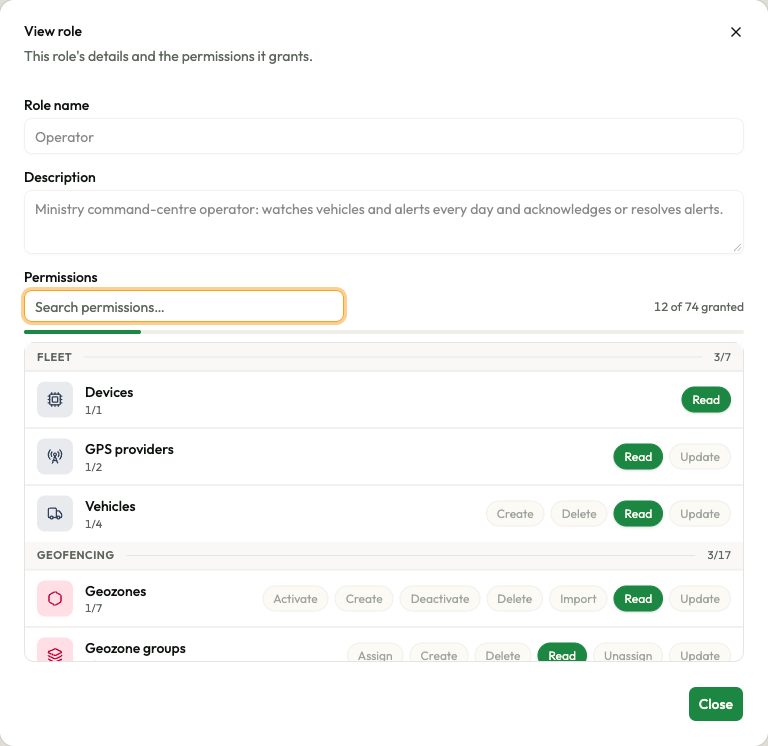
The counter at the right of the search box ("15 of 74 granted") tells you how many rights the role holds out of everything IFMS knows about. Granted rights are the filled green pills; the pale ones are not granted. Scroll the list to see every group. Select Close when you are done.
The permission list
The permissions are grouped in six bands. Each line in a band is one area of IFMS, with its own icon, and the pills on the right are the things that can be done in that area.
| Band | Area | What it unlocks in the portal |
|---|---|---|
| FLEET | Vehicles | Read: Fleet, vehicle pages, the live map and the Overview map. Vehicles cannot be created, changed or removed, so there is nothing else to grant. |
| GPS providers | Read: Providers and each provider's page. | |
| GEOFENCING | Geozones | Read: Geofencing. Create: Add geozone. Update: change a zone. Delete: delete and restore zones. Activate / Deactivate: the zone's Active switch, one direction each. Import: Import CSV. |
| Points of interest | Nothing visible. | |
| Geozone groups | Create: New group. Update: the group field on a zone. Delete: delete a group. | |
| ALERTS | Alerts | Read: Events. Acknowledge / Resolve: those buttons, on one alert or several at once. |
| Alert policies | Read: Alert Policies and a read-only view of each policy. Create: New policy. Update: edit a policy and its Active switch. Delete: delete a policy. | |
| Notifications | Read: the bell and Inbox update live. Send / Write: nothing visible. | |
| Notification templates | Nothing visible. | |
| Alert routing | Read: Alert Routing. Create: Add rule. Update: edit a rule and its Enabled switch. Delete: delete a rule. | |
| REPORTS | Reports | Read: Reports & Analytics, every report and its export, and the dated tiles on the Dashboard. |
| DASHBOARDS | Dashboards | Read: the Dashboard. Write: Customise, and keeping your own layout. Manage defaults: nothing visible yet. |
| ADMINISTRATION | Roles | Read: Roles & Permissions, and the Role filter on Users. Create: Add role. Update: edit a custom role. Activate / Deactivate / Delete: those menu items. |
| Tenants, Tenant members, Tenant member roles | Nothing visible. | |
| Users | Read: Users. Create: Add user. Update: Edit. Deactivate / Activate: Deactivate and Reactivate. Import / Export: nothing visible. | |
| Permissions | Read: the permission list in this editor. | |
| Directory sync | Nothing visible. |
Areas marked "nothing visible" are used by IFMS itself or by other systems. Granting them changes nothing a person can see.
Add a role
You will create a new bundle of rights and give it a name that people will recognise.
Before you start
- You need the right to create roles (System admin).
- Decide in plain words what the role should be able to do, and what it must not be able to do.
Steps
-
Select Add role at the top right.
-
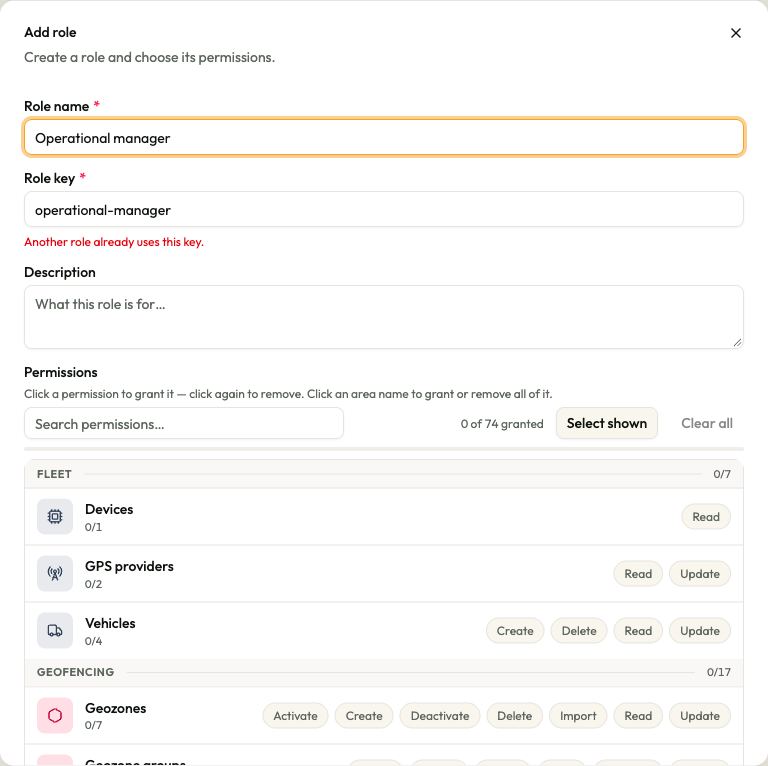
Type the Role name (the box suggests "e.g. Regional auditor"). This is what appears on the Users screen and in the role pickers, so use the job people know: "Border liaison officer", "Corridor analyst". The name is required, and can be written in any language.
-
Check the Role key. It fills itself in from the name — "Border liaison officer" becomes
border-liaison-officer— until you type in it yourself. The key is the role's fixed internal name: it can never be changed later and must not be used by any other role. Use lowercase letters a–z, digits and hyphens.If the name is written only in Amharic letters, the key stays empty: type a Latin-letter key yourself.
-
Optionally type a Description ("What this role is for…") — one line saying who the role is for. It is shown under the role's name in the list, so it is worth writing.
-
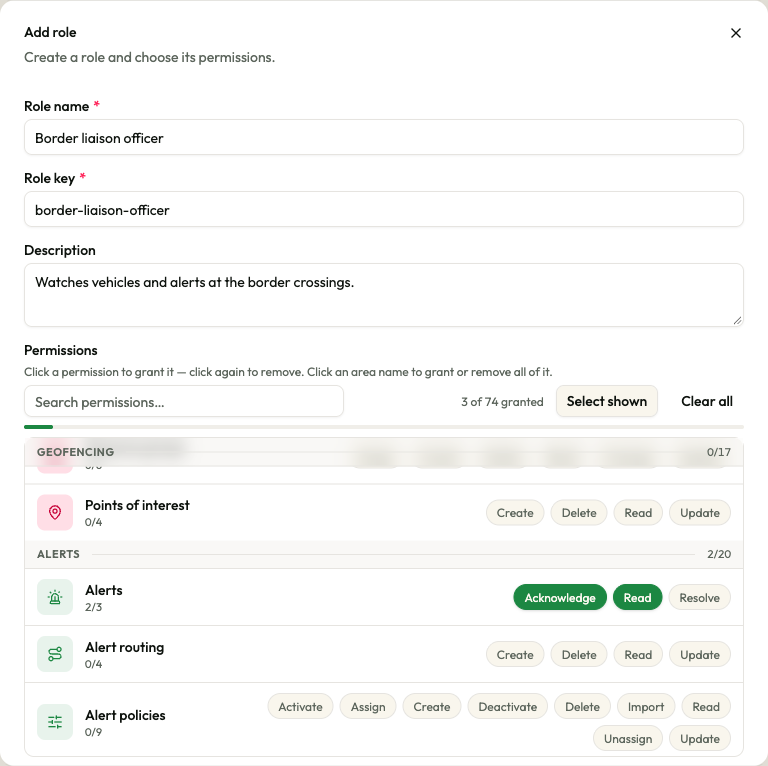
Choose the permissions (see The permission list).
- Select a pill to grant it; select it again to take it away. Granted pills turn solid green.
- Hovering a pill spells the right out, using IFMS's own short names: on Alert policies it reads "Read Event", on Roles "Read Authz role".
- Selecting the area name (or its icon) grants everything on that line, and selecting it again removes it all.
- The small numbers under the area name ("1/7") show how many of that area's rights the role has.
- The numbers at the right of a band ("3/15") count the whole band. Selecting them grants or removes the whole band.
-
Use Search permissions… to find an area quickly — it matches area names and action names, so typing
geozoneleaves only the geozone lines.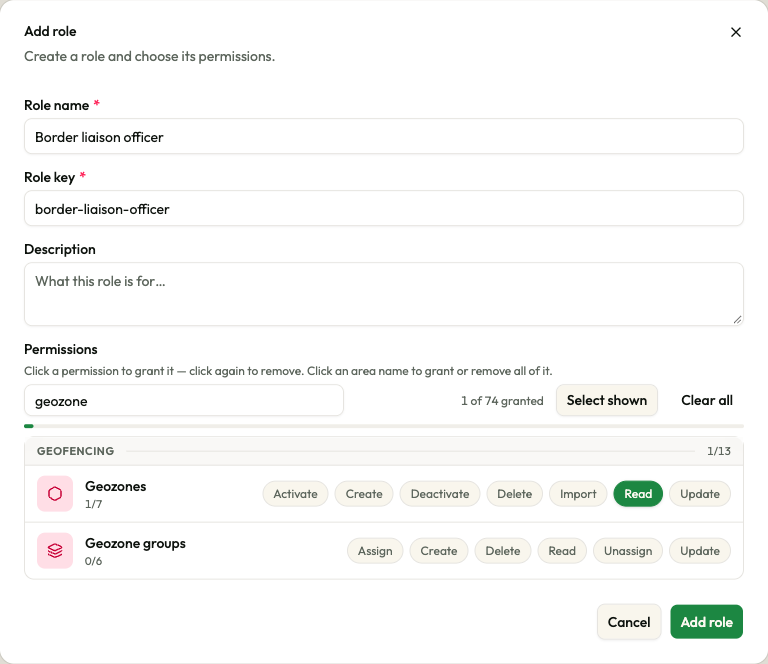
-
Watch the counter ("3 of 74 granted") and the thin bar under it to see how much you have handed out.
-
Select Add role. A green "Role name added." confirms it and the role appears in the list, ready to be given to people on the Users screen.
Cancel or ✕ closes the window and keeps nothing.
The fields
| Field | Required | What to enter | Rules and messages |
|---|---|---|---|
| Role name | Yes | The job name people will recognise | Cannot be blank. The Add role button stays greyed out while it is empty. |
| Role key | Yes | The fixed internal name, filled in for you | Shown only when adding a role. See the messages below. |
| Description | No | One line: who this role is for | Shown under the name in the list. |
| Permissions | No | The rights the role grants | A role with none can be created; it simply lets its holders see the Overview and their Inbox. |
| Message under Role key | What to do |
|---|---|
| "Type a key using letters a–z, digits and hyphens." | The key is empty. Type one. |
| "Use lowercase letters a–z, digits, hyphens or underscores." | Remove capitals, spaces and other characters. |
| "This key belongs to a built-in role." | Choose another key. |
| "Another role already uses this key." | Choose another key. Typing a built-in role's name, such as "Operational manager", produces this. |
Select shown grants every right left visible by your search, and only those. Clear all removes every granted right, including ones your search is hiding. It is greyed out while nothing is granted.
Edit a role
- Select the row of a custom role that is switched on, or open its row menu and select Edit.
- Change the Role name, the Description or the permissions. The role key cannot be changed.
- Select Save changes. A green "Role updated." confirms it.
Save changes stays greyed out until the role's current permissions have loaded. If they cannot be loaded, a red line reads "This role's current permissions could not be loaded, so it cannot be edited safely. Close the dialog and try again."
If the name and description save but the permissions are refused, the window stays open with an amber box reading "Role saved; permissions weren't changed.", the reason underneath, and a Retry permissions button that sends the same permissions again.
Changes reach the people holding the role within a few minutes; a colleague who is signed in may need to reload the page.
Switch a role off or on
- Open the row menu of a custom role and select Deactivate.
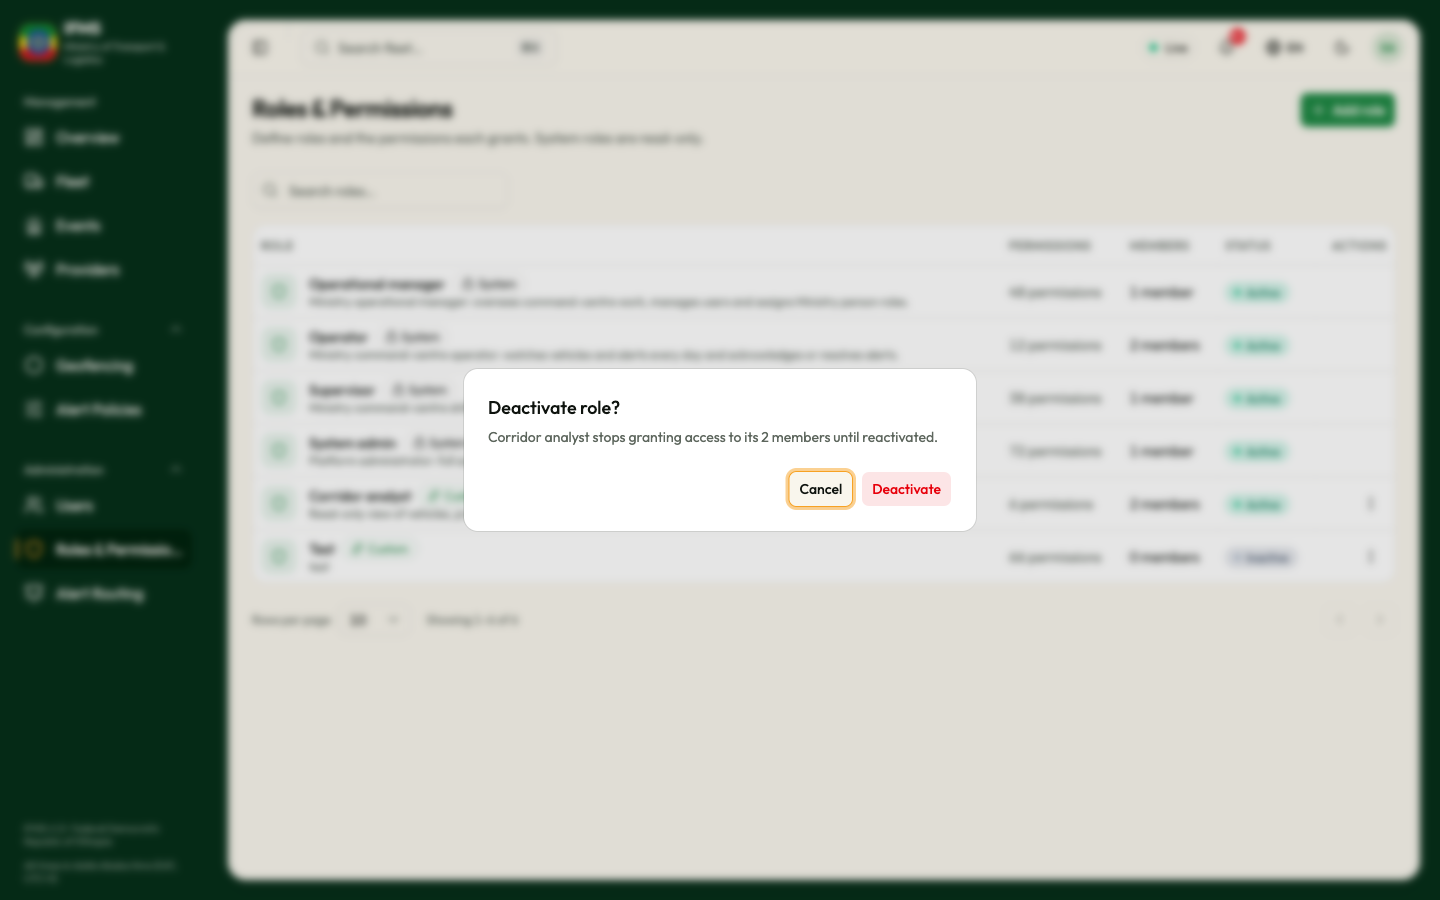
- Read the question: "Deactivate role?" — "name stops granting access to its members until reactivated." The question gives the role's name and how many people hold it.
- Select the red Deactivate, or Cancel.
A green "Role deactivated." confirms it and the role turns Inactive. It stops granting anything to the people who hold it, is no longer offered when adding or editing a user, and is no longer offered as a Target role on Alert routing. The people keep the role on their account, so Activate (same menu) brings everything back at once, with "Role activated." — there is no question for that direction.
Use this rather than deleting when you want to suspend a role for a while, or when a role is assigned to people and cannot be deleted.
Delete a role
- Open the row menu of a custom role and select Delete.
- The question reads "Delete role?" — "This permanently removes the name role."
- Select the red Delete role, or Cancel.
A green "Role deleted." confirms it.
If anybody still holds the role, IFMS refuses and shows a red message explaining that the role is assigned to a number of staff members and that you should either take the role off those people first or deactivate it instead. The MEMBERS column tells you how many people that is before you try. System roles can never be deleted.
Designing a custom role
Work from the job, not from the list of rights:
- Write the job in one sentence. "Analysts at the corridor unit need to read everything about vehicles and alerts, but must change nothing."
- List the screens that job needs. Fleet and vehicle details, Providers, Geofencing, Alert Policies, Events, the live map.
- Grant only Read for those areas first. Read on Vehicles, GPS providers, Geozones, Geozone groups, Alert policies and Alerts covers all of the above. Add Drivers if they need driver records, and Notifications if their bell should update live.
- Add the doing rights one at a time, and only where the job really requires them — Acknowledge and Resolve on Alerts for someone who must handle alerts, Create and Update on Geozones for someone who must draw zones.
- Leave the ADMINISTRATION band alone unless the job is administration. A role that opens Users or Alert Routing also needs Read on Roles, or the role lists on those screens come up empty; Alert Routing also needs Read on GPS providers, or its provider list is empty.
- Check it with a real person. Give the role to one colleague, ask them to walk through their day, and add what is missing. A missing right shows up as a missing sidebar item, a missing button, an empty list, or an "Access denied" page.
Worked example: Corridor analyst
The demonstration system carries a custom role called Corridor analyst, described as "Read-only view of vehicles, providers, geozones, policies and events for corridor analysts and auditors." It grants six rights, all of them Read: Vehicles, GPS providers, Geozones, Geozone groups, Alert policies and Alerts. That is enough to watch the whole corridor and read every alert, and not enough to change a single record.
Someone holding only this role sees Overview, Fleet, Licences & Permits, Providers, Geofencing, Alert Policies (each policy opens read-only), Events, the live map and their Inbox — with no buttons to create, edit, acknowledge or delete anything, no Drivers screen, and no Administration group in the sidebar.
Related pages
- Users — giving roles to people.
- Alert routing — sending alerts to everyone who holds a role.
- What each role can do